Getting Started with Login Sessions: Express, Client Sessions, and React
By Kevin Hou
7 minute read
Introduction
What is a cookie?
A cookie is a piece of data attached to the header of an Internet request. It's the browsers way of storing data about a website. A site might use cookies to track what's in your shopping cart, when your last visit was, or who's logged in to your site which is what we will be covering in this blog post.
How does it work?
In short, the user logs in and sends their username and password to an API endpoint on the server. If authenticated, the server will send back and set a cookie with the session on the browser (ie. client). Until the cookie expires, all communication between the client and the server will include a cookie, or encrypted string, that can be used for authentiction, sessions, etc.
My Stack
I'm running an ES6, React-Redux-Router client web app compiled with Webpack and served by my server. My server is an Express, Typescript, Webpack, NodeJS app connected to a Postgres database and Sequelize as my database API interface. My entire setup runs on Heroku.
Server-Side
Middleware: Enabling Cookies
We must first setup the infrastructure for cookies using client-sessions. This involves using middleware to both configure and "enable" cookies. We use create a middleware with the specified configuration:
1app.use(sessions({
2	cookieName: 'session', // cookie name dictates the key name added to the request object
3	secret: 'somecrazykeythatyoushouldkeephidden', // store in environment variables
4	duration: 60 * 60 * 1000, // how long the session will stay valid in ms
5	activeDuration: 1000 * 60 * 5, // if expiresIn < activeDuration, the session will be extended by activeDuration milliseconds
6}));
7
The secret key should be kept secret for security reasons. This serves as the encryption method for the cookie contents. Because a cookie is just a string attached to a header, it can be theoretically available to the public; however, you don't want your user or curious browsers to see what you are setting as it could contain sensitive information. It often contains email addresses, authentication tokens, and if the developer really has no sense of security, passwords.
In order to keep all this information confidential, we use a long string as our key and perform an LFSR (Linear Feedback Shift Register) — an effective type of encryption. Because the key is stored on the server (keep it as an process.env variable if your code is open-source), the server can decrypt it as well. If you are curious about LFSR, feel free to check out a version I wrote in python.
Restricting access based on cookies
Once a cookie is set, you can easily use this cookie to restrict access to various parts of your app. client-sessions handles the decryption so the cooke simply becomes another variable that you can read in that is attached to the request variable in Express. Instead of adding logic to every individual route or controller, I added my authentication logic to my middleware like so:
1app.use((req, res, next) => {
2    // APIs that client must be logged in for
3    // Best practice: APIs that are accessible via the client but require a login
4    // APIs are already protected by a Basic Auth, this is just a safegaurd
5    const blacklisted = [
6        '\/api\/users\/create',
7    ]
8    const path = req.originalUrl;
9    if (!req.session.user) {
10        console.log('No session');
11        if (new RegExp(blacklisted.join('|'), 'i').test(path)) { // If on the blacklist
12            res.status(401).send('Please log in');
13        } else { // Allowed
14            next();
15        }
16    } else {
17        next();
18    }
19});
20
Because I already encrypt my server and client with Basic Authentication, I did not need to have restricted access on every part of my app. I instead created a blacklist of url regexes that require authentication. If a request is made to that URL or set of URLs, the request will be cut short and a 401 unauthorized response will be returned telling the user/client ot log in.
Client-Side
Logging In
In order to set a cookie on the client-side, we need a /api/login endpoint that checks against a database of users and sets a cookie. I'm using Sequelize so the database management is fairly straightforward. My login route hits this function below:
1export const login = (req: Request, res: express.Response) => {
2    const data = req.body; // Takes in values in the body
3    if (data.username === undefined || data.password === undefined) { // Empty authentication
4        res.status(200).send({
5            success: false,
6            error: 'Please submit a username and password',
7        });
8        return; // Terminate
9    }
10    return User // Sequelize - perform a lookup in the database
11        .findOne({
12            where: {
13                username: data.username,
14                password: data.password,
15            }
16        })
17        .then((user: User) => {
18            if (user == null) { // No user — Invalid credentials
19                res.status(200).send({ // Send response
20                    success: false,
21                    error: 'Invalid username & password',
22                });
23                return;
24            }
25
26            // Valid credentials
27            console.log(`Successfully logged in user: ${user.username}`);
28            delete user.password; // Don't send back password for security reasons
29            req.session.user = user; // Set the cookie
30
31            // Send a message back to the client
32            res.status(200).send({
33                success: true,
34                user, // Send user
35            });
36        })
37        // Error with sequelize
38        .catch((error: Error) => {
39            console.log(error);
40            res.status(400).send({
41                success: false,
42                error,
43            });
44        }); // Error in request
45}
46
Set a browser cookie from an API response
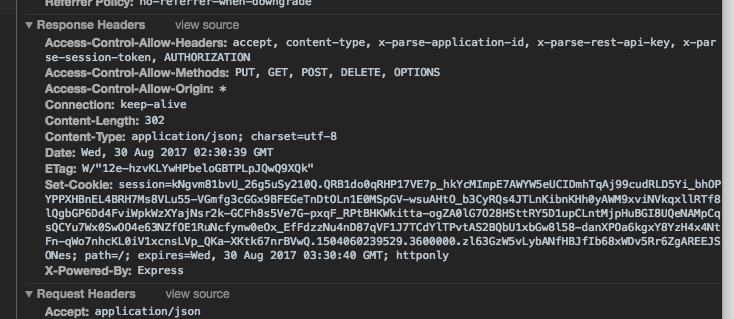
Now that we know how to send a cookie back from the server, we must now inject that cookie into the browser so the session can actually be tied to a browser. The client-session package automatically sets the appropriate cookie on the response header as Set-Cookie. This indicates to the browser to store the response as a cookie. Any response with the property Set-Cookie, as seen below, will do just that.
In order for the client to allow setting a cookie, the fetch request must be same-origin. This is a security feature that ensures malicious cookies have a harder time. I'm using whatwg-fetch and in my fetch request, I set credentials: 'same-origin':
1return fetch(url, {
2	method: 'POST',
3   	headers: {
4   		Accept: 'application/json',
5	   	"Content-Type": "application/json"
6    },
7    credentials: 'same-origin', // Will set cookie 'set-cookie' only if this is set to 'same-origin'
8}
9
In this situtation, there was a successful login from the login page that sent back a cookie. The browser set this cookie in the header so every request to my domain will include this cookie in the future — at least until it expires. The cookie was encrypted on the server side and can only be decrypted by the server. It also has an expiration date so a user's session will expire.
Logging Out
Logging out is much more straightforward. It simply involves removing the cookie from the headers — thus reseting the cookie on the client-side.
1export const logout = (req: Request, res: express.Response) => {
2    const previousUser = req.session.user; // Save the previous user
3    req.session.reset(); // Reset the cookies
4
5    // Response to client
6    res.status(200).send({
7        success: false,
8        user: previousUser,
9    });
10}
11
Getting User Information after Load
Cookies only allow information to be sent back from the server, so we need a seperate method to get information about the user like their name, email, etc. We do this by creating a method that returns unencrypted data about the user based on the session cookie. It's also a helpful API for determining if a user is currently signed in. Here's an example:
1export const currentUser = (req: Request, res: express.Response) => {
2    if (req.session.user) {
3        delete req.session.user.password; // Remove password
4        const data = {
5            logged_in: true,
6            user: req.session.user,
7        };
8        res.status(200).send(data);
9    } else {
10        const data = {
11            logged_in: false,
12        };
13        res.status(200).send(data);
14    }
15}
16
In my React-Redux-Router app, I make this API request on entry so that my local redux state contains information about my user right on load. This allows me to populate sections of my app like a 'Profile' section as well as restricting certain routes.